
Loading Plain Paper / Photo Paper
Load paper in cassette 1 or cassette 2.
* This example demonstrates loading in cassette 1, but paper is loaded the same way in cassette 2.
Watch the movie
![]() Important
Important
- Paper may jam if you test printing by cutting plain paper into smaller sizes, such as 4" x 6" (10 x 15 cm) or 5" x 7" (13 x 18 cm).
![]() Note
Note
- In cassette 1, you can load all sizes of paper that are compatible with the machine, such as plain paper, photo paper, and envelopes.
- In cassette 2, load A4, Letter, Legal, Oficio, B-Oficio, M-Oficio, Foolscap, or Legal (India)-sized plain paper.
- For details on sizes and weights of paper you can use, see Supported Media Types.
- For instructions on loading envelopes, see Loading Envelopes.
-
Prepare the paper.
Align the edges of the paper. If the paper is curled, flatten it.

 Note
Note- Align the edges of paper neatly before loading it. Loading an uneven stack of paper may cause paper jams.
-
If paper is curled, gently bend the curled corners in the opposite direction to flatten the paper.
For details on how to flatten curled paper, see "Correct curl before loading paper." in Paper Is Smudged / Printed Surface Is Scratched.
- Slight curling of Photo Paper Plus Semi-gloss SG-201 should not be straightened. Instead, load one sheet at a time as-is. Bending this kind of paper to flatten it may crack the surface and reduce print quality.
-
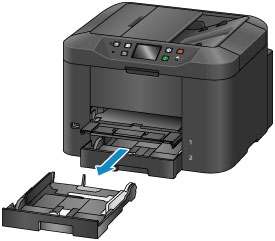
Pull out a cassette.
-
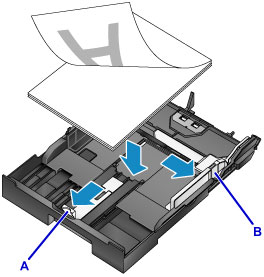
Slide the front (A) and right (B) paper guides out to make room for the paper.
-
Load the stack of paper printing-side DOWN, centered on the cassette.
 Important
-
Always load paper in portrait orientation (C). Loading paper in landscape orientation (D) may cause paper jams.

Note- Some paper such as photo paper has distinct top and bottom surfaces. Load this paper with the whiter or glossy side facing down.
-
Align the stack of paper with the edge of the cassette as shown.
Feeding problems may occur if the paper is touching the protrusion (E).

-
To load paper 5" x 7" (13 x 18 cm) or smaller, lift the tab (F) on the paper guide. (Only cassette 1 can be used for paper of this size.)

-
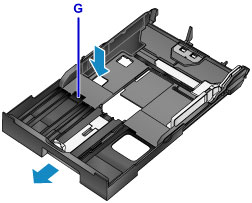
To load paper larger than A4 size, press the lock (G) and pull the cassette all the way out.
-
-
Align the front paper guide (A) with the stack.
The paper guide (A) clicks into place when aligned with a page size marked on the cassette.
-
Slide the right paper guide (B) to align the right and left guides with both edges of the stack.
Do not set the paper guides too firmly against the paper, which may cause feeding problems.
 Note
Note- Do not load sheets of paper past the load limit mark (H).
- Keep the stack height below the paper guide tabs (I).
-
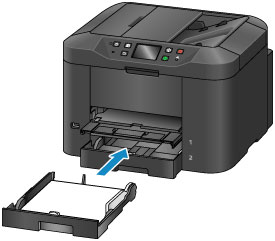
Insert the cassette.
Push the cassette into the machine until it stops.
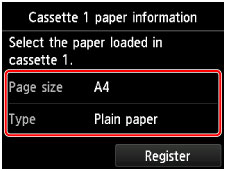
After you insert the cassette, a screen for registering paper information for the cassette is displayed on the touch screen.
 Note
Note- Paper A4 or Letter-sized or smaller: The cassette stops at the same position as the extended paper output tray, which then covers the cassette.
-
Paper larger than A4 or Letter size: The cassette protrudes past the paper output tray. Do not force the cassette into the machine any further, which may damage the machine or cassette.
-
Select the size and type of paper in the cassette in Page size and Type, and then tap Register.
Follow the instructions of any messages displayed to register the paper information.
-
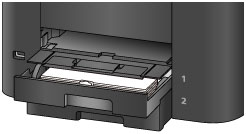
Pull out the output tray extension (J) and open the paper output support (K).

![]() Note
Note
- Before printing, select the size and type of paper loaded, either on the print settings screen of the operation panel or in the printer driver.
