
* All lamps on the operation panel are shown lit in the illustration below for explanatory purposes.
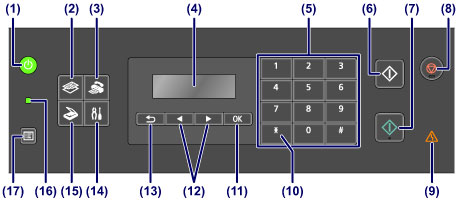
(1) ON button (POWER lamp)
Turns the power on or off. Lights or flashes green to indicate the power status. Before turning on the power, make sure that the document cover is closed.
![]() Turning the Machine On and Off
Turning the Machine On and Off
(2) COPY button
Switches the machine to the copy mode. The Copy standby screen is displayed, which lets you make copies while specifying the number of copies.
(3) FAX button
Switches the machine to the fax mode. The Fax standby screen is displayed, which lets you send a fax by dialing a fax/telephone number directly with the Numeric buttons.
(4) LCD (Liquid Crystal Display)
Displays messages, menu items, and the operational status.
![]() Confirming that the Power Is On
Confirming that the Power Is On
(5) Numeric buttons
Used to enter numerical values such as the number of copies, as well as fax/telephone numbers and characters.
(6) Black button
Starts black & white copying, scanning, faxing, etc.
(7) Color button
Starts color copying, scanning, faxing, etc.
(8) Stop button
Cancels operation when print, copy, scan, or fax transmission/reception job is in progress.
(9) Alarm lamp
Lights or flashes orange when an error occurs, such as paper-out or ink-out.
(10) Tone button
Switches to tone dialing temporarily if your machine is connected to a rotary pulse line and changes the input mode for entering characters. This button is also used to dial with the Numeric buttons.
(11) OK button
Finalizes the selection of a menu or setting item.
Resolves an error when printing is in progress, resumes the machine's normal operation after removing jammed paper, or ejects documents remaining in the ADF (Auto Document Feeder).
(12)  and
and  buttons
Used to increase/decrease a setting value such as the number of copies, and select a menu or setting item. The or button is also used when entering characters.
(13) Back button
Returns the LCD to the previous screen. This button is also used to delete a character under the cursor when entering characters, such as when entering a name for registration.
(14) Setup button
Displays the Setup menu screen. With this menu, you can perform machine maintenance and change machine settings.
![]() When Printing Becomes Faint or Colors Are Incorrect
When Printing Becomes Faint or Colors Are Incorrect
![]() Changing the Machine Settings on the LCD
Changing the Machine Settings on the LCD
You can also configure a wireless LAN connection.
(15) SCAN button
Switches the machine to the scan mode. The Scan standby screen is displayed, which lets you start scanning by pressing the Color or Black button.
(16) FAX Memory lamp
Lights when there are received or unsent documents stored in the machine's memory.
(17) Menu button
Displays the Copy menu, FAX menu, or Scan menu screen.
Copy menu allows you to select various copy functions or change print settings, such as page size and media type.
FAX menu allows you to dial by selecting an entry from Memory dial, print a report/list, or change the receive mode.
Scan menu allows you to change the location for saving the scanned data or select the document type to be scanned.
 Note Note
|
Page top |

