
Registering Recipients to Coded Memory Dial
Before you can use the coded memory dialing feature, you need to register the recipients' fax/telephone numbers. Follow the procedure below to register the recipients' fax/telephone numbers.
-
Press the Setup button.
The Setup menu screen is displayed.
-
Use the

 button to select Fax settings, then press the OK button.
 -
Use the
button to select TEL no. registration, then press the OK button. -
Use the
button to select Memory dial, then press the OK button.The screen to select a coded memory dial code is displayed.

-
Use the
button or the Numeric buttons to select an unoccupied coded memory dial code, then press the OK button. Note
Note-
If you select a code already used as a coded memory dial, the fax/telephone number is displayed. If you select a code already used as a group dial, (Not available) is displayed.
-
-
Use the
button to select a registration method, then press the OK button. -
Register the recipients' fax/telephone number.
Register the recipients' fax/telephone number depending on the registration method selected.
-
From call log (OUT)
When you select this registration method, the screen to select the fax/telephone number from the outgoing call logs is displayed.

-
Use the
button to select a fax/telephone number, then press the OK button.The fax/telephone number selected from the outgoing call logs is displayed.
-
Check the fax/telephone number, then press the OK button.
The fax/telephone number is registered to the machine and the screen to enter the recipient's name is displayed. Go to next step.
-
-
From call log (IN)
When you select this registration method, the screen to select the fax/telephone number or the name from the incoming call logs is displayed.

-
Use the
button to select a fax/telephone number or a name, then press the OK button.The fax/telephone number selected from the incoming call logs is displayed.
-
Check the fax/telephone number, then press the OK button.
The fax/telephone number is registered to the machine and the screen to enter the recipient's name is displayed. Go to next step.
Note-
This registration method may not be available depending on the country or region of purchase.
-
-
Direct entry
When you select this registration method, the screen to enter the fax/telephone number is displayed.

-
Use the Numeric buttons to enter the fax/telephone number you want to register.
-
Press the OK button.
The fax/telephone number is registered to the machine and the screen to enter the recipient's name is displayed. Go to next step.
Note-
You can enter the fax/telephone number up to 60 digits (40 digits for the US, Canada, Korea and some regions of Latin America), including spaces.
-
For details on how to enter or delete characters:
-
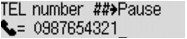
Press the
 button twice to enter a pause.
 -
When Telephone line type in FAX user settings under Fax settings is set to Rotary pulse, you can enter a tone ("T") by pressing the Tone button.
-
-
-
-
Use the Numeric buttons to enter the recipient's name.
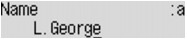
If you select a name on From call log (IN) in step 8, the name may be already entered. If you do not change the name, go to step 10.
Note-
You can enter the name up to 16 characters, including spaces.
-
For details on how to enter or delete characters:
-
-
Press the OK button to finalize registration.
Note-
To register another recipient's number and name to a coded memory dial, select an unoccupied coded memory dial code and operate in the same procedure when you register.
-
To return to the Fax standby screen, press the FAX button.
-
You can check the recipient's numbers and names you have registered by printing MEMORY DIAL TELEPHONE NO. LIST.
-
