
Editing Custom Paper
Edit the media information of the custom paper you added to the printer to obtain a high quality print result.
For details on the procedure for adding custom paper to the printer, see "Adding Custom Paper."
 Important
-
Do not attempt to print or turn the printer off while the program is communicating with the printer.
Do not add or edit media information on a printer from another computer while it is being added or edited.
-
We recommend backing up the media information in advance before editing media information.
For how to back up media information, see "Back Up Base Printer Media Information" in "Copying Media Information from the Base Printer to Another Printer".
-
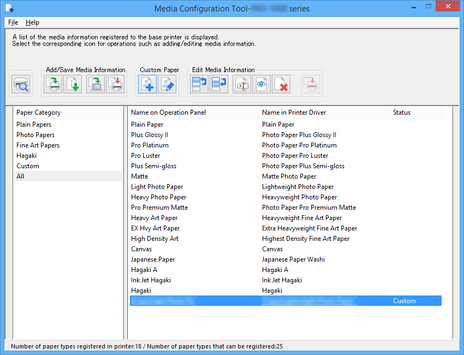
Select the custom paper that you want to edit.
-
Click
 (Edit Custom Paper) in the Custom Paper button group.
 Note
Note-
If the base paper selected for the custom paper is not registered in the printer, the following dialog box appears.

Select Acquire the latest information by connecting to the Internet, and then click the Next button.
-
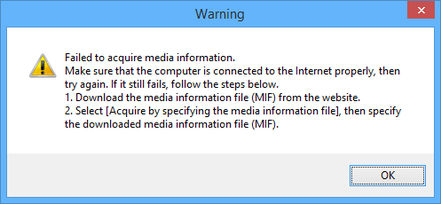
If the following message appears, the media information file cannot be downloaded from the Internet.
Obtain the media information file from the Canon website using a computer connected to the Internet.
Specify the media information file that you obtained by selecting Acquire by specifying the media information file, clicking the Acquire button, and specifying the file in the Open dialog box.
-
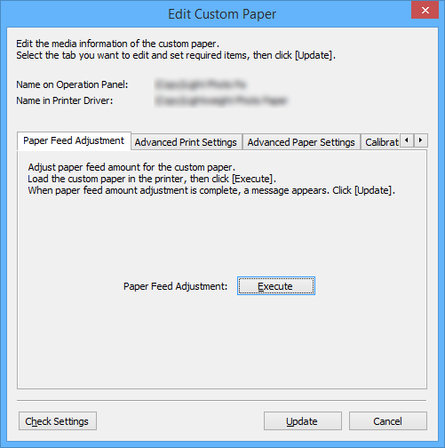
The Edit Custom Paper dialog box appears.
Important-
Edit the custom paper in the Edit Custom Paper dialog box in the order shown below.
If you do not follow this order, you may need to configure the settings again.
-
Paper Feed Adjustment sheet
-
Advanced Print Settings sheet
-
Advanced Paper Settings sheet
-
Calibration Target sheet
-
ICC Profile sheet
-
-
We recommend that you always perform paper feed adjustment. Set other items as needed.
-
After you have selected the settings, always click the Update button.
-
-
Specify the paper feed amount in the Paper Feed Adjustment.
 Important
-
If Paper Feed Adjustment is not executed, horizontal stripes with different color tones may appear in the printed material. Execute paper feed adjustment only once each time you add a custom paper.
-
Click the Execute button.
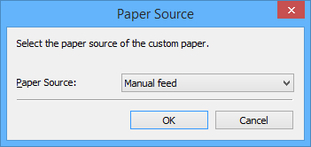
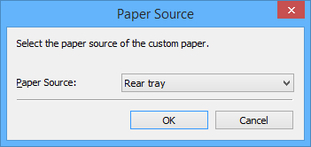
The Paper Source dialog box appears.
-
Select the paper source where the custom paper is loaded.
 Important
-
The paper sources that can be loaded vary depending on the custom paper.
-
-
Load the custom paper in the paper source you selected.
Important-
Do not load paper that is curled or that has already been printed on.
-
-
Click the OK button.
The adjustment pattern is printed, and the paper feed is automatically adjusted based on the printing result.
Important-
Check that there is no paper left on the ejection guide.
-
-
-
Specify the Drying Time in the Advanced Print Settings sheet.
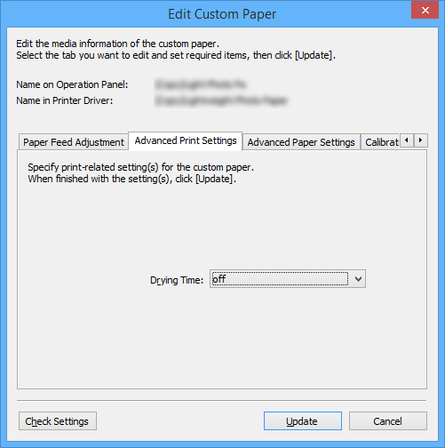
Specify the time that the printer waits for ink to dry. For paper where the ink does not dry well, specify the drying time.
- off
-
Soon after printing finishes, the next page will start to print.
- 30second(s)/1minute(s)/3minute(s)/5minute(s)
-
The next page will start to print after the specified time has elapsed after the previous printing.
-
Specify the Paper Thickness (Head Height) in the Advanced Paper Settings sheet.
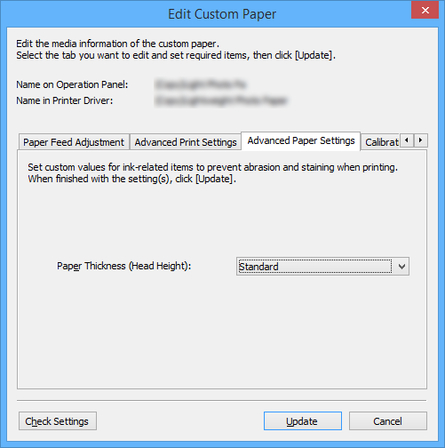
Sets the height of the printhead. Set this higher if the printhead is rubbing against the paper.
- Low/Standard/Medium-high/High
-
You can specify four levels. The higher the level, the more distance between the printhead and the paper.
- Important
-
If you set Paper Thickness (Head Height) too low, the printhead might rub against the paper. If the printhead rubs against the paper, there will be scratches in the printing results and the printhead may be damaged.
-
-
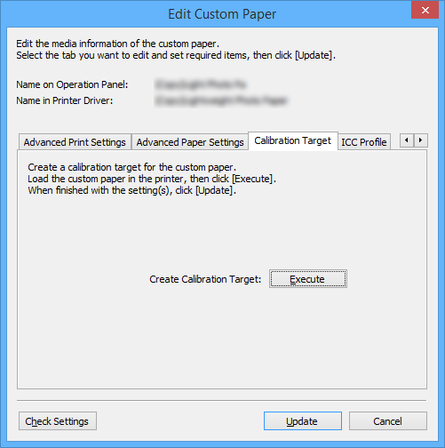
Create the calibration target on the Calibration Target sheet.
 Note
Note-
If the Calibration Target of the selected base paper was set to Not creatable in the Create Custom Paper dialog box when the custom paper was added, the calibration target cannot be created.
-
Calibration can be performed for custom paper if a calibration target has been created.
-
Click the Execute button.
The Paper Source dialog box appears.
-
Select the paper source where the custom paper is loaded.
 Important
-
The paper sources that can be loaded vary depending on the custom paper.
-
If you are using a PRO-1000 or PRO-500 model, only the rear tray can be used as the paper source for color calibration.
-
-
Load the custom paper in the paper source you selected.
Important-
Do not load paper that is curled or that has already been printed on.
-
If a paper source cannot be selected, load the paper into the paper source that is displayed in Paper Source.
-
-
Click the OK button.
The calibration target is created for the loaded custom paper.
-
-
Select the ICC profile on the ICC Profile sheet.
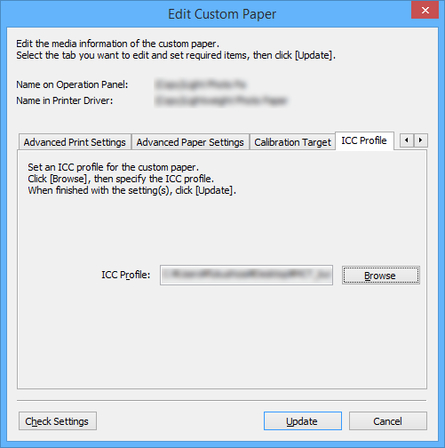
If a suitable ICC profile has been provided for the custom paper to be edited, click the Browse button, and select the ICC profile.
Important-
Only the RGB print profile can be selected for the ICC profile.
Depending on the file size, you may not be able to use the profile.
-
Alphanumeric characters, spaces, "-", "_", "(", and ")" can be used in ICC profile file names.
For ICC profile file names, up to 64 single-byte characters can be entered including the extension.
-
-
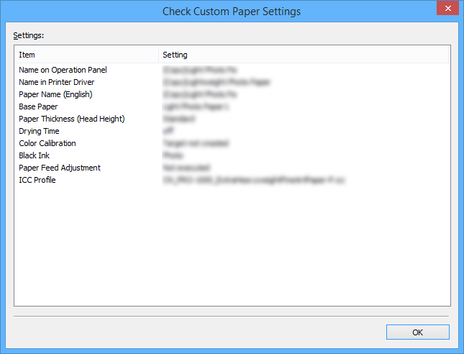
Click the Check Settings button.
The Check Custom Paper Settings dialog box appears.
-
Verify the settings of the custom paper, and then click the OK button.
-
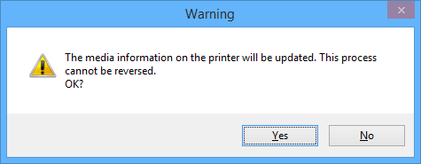
In the Edit Custom Paper dialog box, click the Update button.
The Update Media Information dialog box appears.
-
From the displayed printers, select the printers that you want to update the custom paper media information for at the same time as the base printer, and click the Execute button.
 Note
Note-
If the printer you want to update is not displayed, verify the state of the printer and network, and then click the Find Printer button.
-
In addition to the base printer, the printers that are the same model as the base printer appear.
-
You cannot clear the check mark for the base printer.
-
-
Click the Yes button.
The Check Update Results dialog box appears.
-
Verify that
 mark appears to the left of the Printer Name, and then click the OK button.
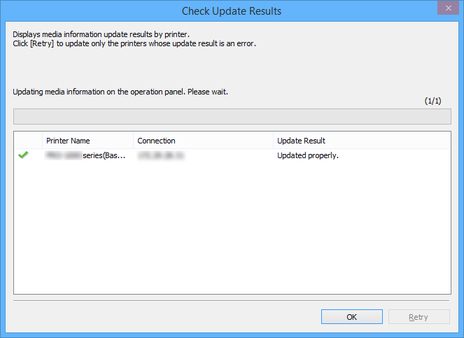 Note
Note-
Custom paper media information was not updated for printers with a
 mark displayed to the left of the Printer Name.
Verify the state of the printer and network, and click the Retry button.
Custom paper media information will be updated again for printers with the
mark.
The edited media information for the custom paper is applied to the printers.
-
