
Quick Setup tab Description
The Quick Setup tab is for registering commonly used print settings. When you select a registered setting, the printer automatically switches to the preset items.
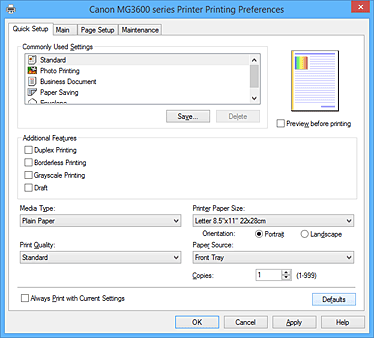
- Commonly Used Settings
-
The names and icons of frequently used printing profiles are registered. When you select a printing profile according to the purpose of the document, settings that match the purpose are applied.
In addition, functions that are thought to be useful for the selected printing profile are displayed in Additional Features.
You can also change a printing profile and register it under a new name. You can delete the registered printing profile.
You can rearrange the profiles either by dragging the individual profiles or by holding down the Ctrl key and pressing the up or down arrow keys.- Standard
-
These are the factory settings.
If Page Size, Orientation, and Copies were set from the application software, those settings have priority. - Photo Printing
-
If you select this setting when printing a photo, the photo paper and photo size generally used are set. The Borderless Printing check box is checked automatically.
If Orientation and Copies were set from the application software, those settings have priority. - Business Document
-
Select this setting when printing a general document.
If Page Size, Orientation, and Copies were set from the application software, those settings have priority. - Paper Saving
-
Select this setting to save paper when printing a general document. The 2-on-1 Printing and Duplex Printing check boxes are checked automatically.
If Page Size, Orientation, and Copies were set from the application software, those settings have priority. - Envelope
- If you select this setting for printing an envelope, Media Type is set automatically to Envelope. In the Envelope Size Setting dialog box, select the size of the envelope to be used.
 Note
Note- The combination of the Additional Features that was displayed for the printing profile that had been selected when the added printing profile was saved is also displayed when that added printing profile is selected.
- Save...
-
Displays the Save Commonly Used Settings dialog box.
Click this button when you want to save the information that you set on the Quick Setup, Main, and Page Setup tabs to Commonly Used Settings.
- Delete
-
Deletes a registered printing profile.
Select the name of the setting to be deleted from Commonly Used Settings, and click Delete. When a confirmation message is displayed, click OK to delete the specified printing profile.Note- Printing profiles that are registered in the initial settings cannot be deleted.
- Settings Preview
-
The paper illustration shows how the original will be laid out on a sheet of paper.
You can check an overall image of the layout. - Preview before printing
-
Shows what the print result will look like before you actually print the data.
Check this check box to display a preview before printing.
Uncheck this check box if you do not want to display a preview. Important
- To use the Canon IJ XPS Preview, you must have Microsoft .NET Framework 4 Client Profile installed on your computer.
- Additional Features
-
Displays the frequently used, convenient functions for the printing profile that you selected for Commonly Used Settings on the Quick Setup tab.
When you move the mouse pointer near a function that can be changed, a description of that function is displayed.
To enable a function, check the corresponding check box.
For some functions, you can set detailed settings from the Main and Page Setup tabs.Important- Depending on the printing profiles, certain function may be grayed out and you will not be able to change them.
- 2-on-1 Printing
-
Prints two pages of the document, side by side, on one sheet of paper.
To change the page sequence, click the Page Setup tab, select Page Layout for Page Layout, and click Specify.... Then in the Page Layout Printing dialog box that appears, specify the Page Order. - 4-on-1 Printing
-
Prints four pages of the document, side by side, on one sheet of paper.
To change the page sequence, click the Page Setup tab, select Page Layout for Page Layout, and click Specify.... Then in the Page Layout Printing dialog box that appears, specify the Page Order. - Duplex Printing
-
Selects whether to print the document on both sides or one side of a sheet of paper.
To change the staple side or the margins, set the new values from the Page Setup tab. - Borderless Printing
-
Performs borderless printing without any margins on the paper.
With the borderless printing function, the document to be printed is enlarged, so that it extends slightly off the paper. In other words, the document is printed without any margin.
To adjust the amount that the document extends beyond the paper, click the Page Setup tab, choose Borderless, and enter the value in Amount of Extension. - Grayscale Printing
- This function converts the data to monochrome data when printing your document.
- Draft
- This setting is appropriate for test printing.
- Rotate 180 degrees
-
Prints the document by rotating it 180 degrees against the paper feed direction.
The width of print area and the amount of extension that are configured in other application software will be reversed vertically and horizontally. - Color/Intensity Manual Adjustment
- Select when you set the Color Correction method and individual settings such as Cyan, Magenta, Yellow, Brightness, Intensity, and Contrast, etc.
- Media Type
-
Selects a type of printing paper.
Select a media type that matches the paper that is loaded in the printer. This ensures that printing is carried out properly for the specified paper. - Printer Paper Size
-
Selects the size of paper actually loaded into the printer.
Normally, the paper size is set automatically according to the output paper size setting, and the document is printed with no scaling.
When you set 2-on-1 Printing or 4-on-1 Printing in Additional Features, you can manually set the paper size with Page Size on the Page Setup tab.
If you select a paper size that is smaller than the Page Size, the document size will be reduced. If you select a paper size that is larger, the document size will be enlarged.
Also if you select Custom..., the Custom Paper Size dialog box opens and allows you to specify any vertical and horizontal dimensions for the paper size. - Orientation
-
Selects the printing orientation.
If the application used to create your document has a similar function, select the same orientation that you selected in that application.- Portrait
- Prints the document so that its top and bottom positions are unchanged relative to the paper feed direction. This is the default setting.
- Landscape
-
Prints the document by rotating it 90 degrees relative to the paper feed direction.
You can change the rotation direction by going to the Maintenance tab, opening the Custom Settings dialog box, and then using Rotate 90 degrees left when orientation is [Landscape] check box.
To rotate the document 90 degrees to the left when printing, select the Rotate 90 degrees left when orientation is [Landscape] check box.
- Print Quality
-
Selects your desired printing quality.
Select one of the following to set the print quality level that is appropriate for the purpose.
To set the print quality level individually, click the Main tab, and for Print Quality, select Custom. The Set... becomes enabled. Click Set... to open the Custom dialog box, and then specify the desired settings.- High
- Gives priority to print quality over printing speed.
- Standard
- Prints with average speed and quality.
- Draft
- This setting is appropriate for test printing.
- Paper Source
-
Shows the source from which paper is supplied.
- Front Tray
- Paper is always supplied from the front tray.
- Copies
-
Specifies the number of copies you want to print. You can specify a value from 1 to 999.
Important
- When the application software that you used to create the document has the same function, specify the settings on the printer driver. However, if the print results are not acceptable, specify the function settings on the application software.
- Always Print with Current Settings
-
Prints documents with the current settings starting from the next print execution.
When you select this function and then close the printer driver setup window, the information that you set on the Quick Setup, Main, and Page Setup tabs are saved and printing with the same settings is possible starting from the next print execution.Important- If you log on with a different user name, the settings that were set when this function was enabled are not reflected in the print settings.
- If a setting was specified on the application software, it has priority.
- Defaults
-
Restores all the settings you have changed to their default values.
Click this button to return all settings on the Quick Setup, Main, and Page Setup tabs to their default values (factory settings).
Save Commonly Used Settings dialog box
This dialog box allows you to save the information that you set on the Quick Setup, Main, and Page Setup tabs and add the information to the Commonly Used Settings list on the Quick Setup tab.
- Name
-
Enter the name for the printing profile you wish to save.
Up to 255 characters can be entered.
The name appears, with its associated icon, in the Commonly Used Settings list on the Quick Setup tab. - Options...
-
Opens the Save Commonly Used Settings dialog box.
Changes the details of printing profile to be saved.
Save Commonly Used Settings dialog box
Select the icons of the printing profiles to be registered to Commonly Used Settings, and change the items to be saved in the printing profiles.
- Icon
-
Select the icon for the printing profile you wish to save.
The selected icon appears, with its name, in the Commonly Used Settings list on the Quick Setup tab. - Save the paper size setting
-
Saves the paper size to the printing profile in Commonly Used Settings.
To apply the saved paper size when the printing profile is selected, check this check box.
If this check box is unchecked, the paper size is not saved, and consequently the paper size setting is not applied when the printing profile is selected. Instead the printer prints with the paper size specified with the application software. - Save the orientation setting
-
Saves the Orientation to the printing profile in Commonly Used Settings.
To apply the saved print orientation when the printing profile is selected, check this check box.
If this check box is unchecked, the print orientation is not saved, and consequently the Orientation setting is not applied when the printing profile is selected. Instead the printer prints with the print orientation specified with the application software. - Save the copies setting
-
Saves the Copies setting to the printing profile in Commonly Used Settings.
To apply the saved copies setting when the printing profile is selected, check this check box.
If this check box is unchecked, the copies setting is not saved, and consequently the Copies setting is not applied when the printing profile is selected. Instead the printer prints with the copies setting specified with the application software.
Custom Paper Size dialog box
This dialog box allows you to specify the size (width and height) of the custom paper.
- Units
- Select the unit for entering a user-defined paper size.
- Paper Size
- Specifies the Width and the Height of the custom paper. Measurement is shown according to the units specified in Units.
Related Topics
- Printing with Easy Setup
- Setting a Page Size and Orientation
- Setting the Number of Copies and Printing Order
- Execute Borderless Printing
- Duplex Printing
- Setting Up Envelope Printing
- Printing on Postcards
- Displaying the Print Results before Printing
- Setting Paper Dimensions (Custom Size)
- Printing a Color Document in Monochrome
- Specifying Color Correction
- Adjusting Color Balance
- Adjusting Color Balance Using Sample Patterns (Printer Driver)
- Adjusting Brightness
- Adjusting Intensity
- Adjusting Contrast
- Adjusting Intensity/Contrast Using Sample Patterns (Printer Driver)
- Registering a Frequently Used Printing Profile
