
Repairing Your Printer
This section describes how to transport the printer for repairing it.
![]() Important
Important
-
You cannot take ink out of ink tanks.
-
Make sure the tank caps of ink tanks are closed securely. If the ink tank cover is open, close the tank caps properly.
-
Press the ON button to turn off the printer with the print heads installed. The printer protects the print heads by covering them automatically to prevent them from being dried.
-
Do not remove the print heads. Ink may leak.
-
If the inside of the printer becomes dirty, clean with a soft cloth that gets wet with water and squeezed firmly.
-
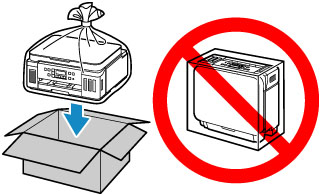
When transporting the printer, pack the printer in a plastic bag so that ink does not leak.
-
Pack the printer in a sturdy box so that it is placed with its bottom facing down, using sufficient protective material to ensure safe transport.
-
Do not tilt the printer; otherwise, ink may leak.
-
When a shipping agent is handling transport of the printer, have its box marked "THIS SIDE UP" to keep the printer with its bottom facing down. Mark also with "FRAGILE" or "HANDLE WITH CARE".
-
Please handle with care and ensure the box remains flat and NOT turned upside down or on its side, as the printer may be damaged and ink in the printer may leak.
Checking Printer Status
-
If the printer does not turn on:
Go to Closing Ink Valve.
-
If the printer is turned on:
If the Alarm lamp is not lit, go to Setting Printer to Transporting Mode.
If the Alarm lamp is lit, press the printer's OK button.
If the Alarm lamp goes off, go to Setting Printer to Transporting Mode.
If the Alarm lamp does not go off, press the ON button to turn off the printer, and then go to Closing Ink Valve.
Closing Ink Valve
-
Make sure ON lamp is not lit and unplug the power cord.
 Important
- Do not unplug the printer while the ON lamp is lit or flashing, as it may cause malfunction or damage to the printer, making the printer unable to print.
-
Open scanning unit / cover.
-
Tilt the ink valve lever tightly to the left.

Go to Securing Print Head Holder.
Setting Printer to Transporting Mode
-
Press Setup button, use

 button to select Maintenance, and press OK button.
 -
Use
button to select Transport mode and then press OK button. -
Use
button to select Yes and then press OK button. Note
Note- When entering the transporting mode and proceeding with the procedure, the power turns off automatically.
-
Open scanning unit / cover.
-
Tilt the ink valve lever tightly to the left.
-
Close scanning unit / cover gently.
The printer is turned off.
-
Make sure ON lamp is not lit and unplug the power cord.
Important- Do not unplug the printer while the ON lamp is lit or flashing, as it may cause malfunction or damage to the printer, making the printer unable to print.
Go to Securing Print Head Holder.
Securing Print Head Holder
-
If scanning unit / cover is closed, reopen it.
-
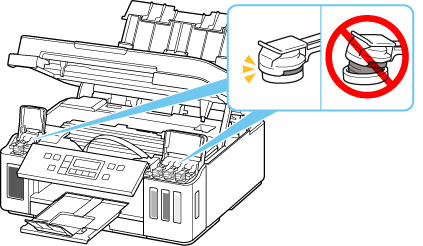
Make sure print head holder has moved to far right.
If the print head holder is not to the right, move it to far right.
If the print head holder does not move, proceed to step 4.
-
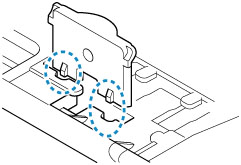
Remove carriage stopper (A) and insert it into the hole securely.
Lift while pulling the carriage stopper toward you, insert with the orientation as it is.
 Note
Note- Insert the protrusion of the carriage stopper in accordance with the recess of the printer.
-
Open ink tank cover to make sure tank caps are closed securely, and then close ink tank cover.
-
Close scanning unit / cover gently.
Go to Packing Printer.
Packing Printer
-
Retract paper output tray and output tray extension.
-
Retract paper support, and then close rear tray.
-
Close operation panel.
-
Unplug cable and power cord.
-
Use adhesive tape to secure all covers or cassette on the printer to keep them from opening.

-
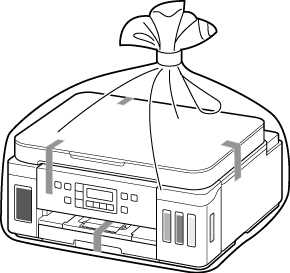
Pack printer in plastic bag.
Seal the mouth of the plastic bag with the tape so that ink does not leak.
-
Pack printer in box.
Attach the protective material to the printer to pack it securely in the box.
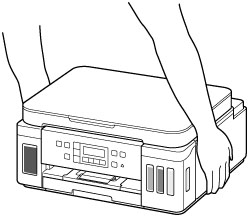
Important-
Carry the printer as shown in the illustration below. If you hold the cassette when carrying, the cassette may come off from the printer.
-
