
Sending Faxes by Entering Fax/Telephone Number
This section describes dialing and sending faxes directly by entering the fax/telephone numbers.
![]() Important
Important
-
It may be possible that faxes will reach unintended recipients due to the misdialing or incorrect registration of fax/telephone numbers. When you send important documents, we recommend that you send them after speaking on the telephone.
-
Load documents on platen glass or in ADF.
 Note
Note-
For details on the types, conditions of document, and how to load the document:
-
-
Select
 FAX on the HOME screen.
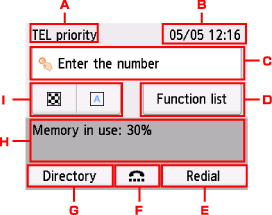
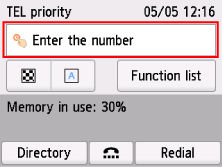
The Fax standby screen is displayed.
-
Receive mode
The receive mode selected currently is displayed.
-
Date and time
The date and time are displayed.
-
Entry field of fax/telephone numbers
Select to display the screen to enter the fax/telephone numbers.
-
Function list
You can use the each fax function and change the setting for the fax.
-
Redial
Select to send faxes with redialing.
-
On hook dial
Select to send faxes with the on hook dial function.
-
Directory
You can select a registered fax/telephone number.
-
Current state
The current state is displayed.
-
Send Settings
Note- If you have not set up the printer for sending/receiving faxes yet, the message for setup is displayed on the touch screen when you select FAX on the HOME screen for the first time. When you set up for faxing, follow the procedure according to the instructions on the touch screen.
-
-
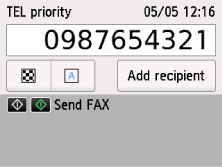
Dial recipient's fax/telephone number.
-
Select entry field of fax/telephone numbers.
-
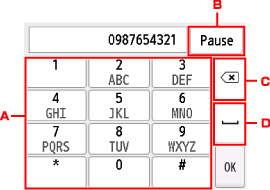
Enter fax/telephone number.
-
Numeric keys
Enters the number.
-
Pause
Enters a pause "P".
-
Delete
Deletes the entered number.
-
Blank space
Enters a blank space.
-
-
Select OK.
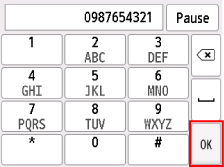
The touch screen returns to the Fax standby screen.
-
-
Press Color button for color transmission, or Black button for black & white transmission.
The printer starts scanning the document.
 Important
- Color transmission is available only when the recipient's fax device supports color faxing.
- Do not open the document cover until scanning is completed.
-
Start sending.
-
If you load the document in the ADF:
The printer scans the document automatically and starts sending the fax.
Note- To cancel a fax transmission, press the Stop button. To cancel a fax transmission while it is in progress, press the Stop button, and then follow the instructions on the touch screen.
- If documents remain in the ADF after the Stop button is pressed while scanning is in progress, Document in ADF. Remove the document from the document tray and tap [OK]. is displayed on the touch screen. By selecting OK, the remaining documents are automatically ejected.
-
If you load the document on the platen glass:
After scanning the document, the confirmation screen asking you if you load the next document is displayed.
To send the scanned document, select Send now to start sending it.
To send two or more pages, follow the message to load the next page, and select Scan. After scanning all pages, select Send now to start sending.
Note- To cancel sending the fax, press the Stop button.
-
![]() Note
Note
- When your printer is connected to a PBX (Private Branch Exchange) system, refer to the operating instructions of the system for details on dialing the recipient's fax/telephone number.
-
In case the printer was not able to send a fax, such as when the recipient's line was busy, it has the function to automatically redial the number after a specified interval. Automatic redialing is enabled by default.
-
Unsent documents, such as those pending redial, are stored in the printer's memory. They are not stored in the case of a sending error.
- Do not unplug the power cord until all documents are sent. If you unplug the power cord, all unsent documents stored in the printer's memory are lost.
