
Operation Panel
* All lamps on the operation panel are shown lit in the figure below for explanatory purposes.
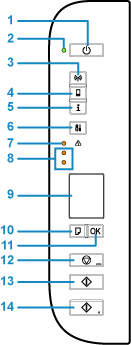
- (1) ON button
-
Turns the power on or off. Before turning on the power, make sure that the document cover is closed.
- (2) ON lamp
- Lights after flashing when the power is turned on.
- (3) Network button
- Activates/deactivates the wireless LAN.
- (4) Direct button
- Activates/deactivates Wireless Direct.
- (5) Information button
- Starts printing network settings information.
- (6) Setup button
- Select a menu to perform printer maintenance and to change printer settings. Pressing this button repeatedly switches the segment display on the LCD.
- (7) Alarm lamp
- Lights or flashes when an error occurs.
- (8) ink lamps
-
Light or flash when ink runs out, etc.
The upper lamp indicates the black FINE cartridge status, the lower lamp the color FINE cartridge status.
- (9) LCD (Liquid Crystal Display)
-
Displays the number of copies, maintenance code, error code or various icons.
- (10) Paper Select button
- Select the paper size of the printer.
- (11) OK button
- Finalizes the selection of paper size setting. This button is also used to resolve an error.
- (12) Stop button
- Cancels operations. You can press this button to cancel a print, copy, or scan job in progress. Holding this button down lets you select maintenance options or printer settings.
- (13) Black button*
- Starts black & white copying. You can also press this button to finalize your selection for the setting item.
- (14) Color button*
- Starts color copying. You can also press this button to finalize your selection for the setting item.
* In the software applications or manuals, the Color and Black buttons are collectively called the "Start" or "OK" button.
