
Operation Panel
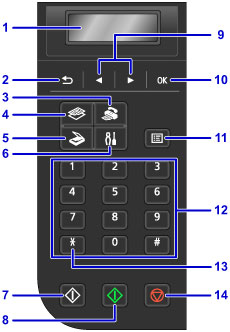
- (1) LCD (Liquid Crystal Display)
- Displays messages, menu items, and the operational status.
- (2) Back button
- Returns the LCD to the previous screen.
- (3) FAX button
- Switches the machine to the fax mode.
- (4) COPY button
- Switches the machine to the copy mode.
- (5) SCAN button
- Switches the machine to the scan mode.
- (6) Setup button
- Displays the Setup menu screen. With this menu, you can perform machine maintenance and change machine settings.
- (7) Black button
- Starts black & white copying, scanning, faxing, etc.
- (8) Color button
- Starts color copying, scanning, faxing, etc.
- (9)
 and
and  buttons
 -
Used to select a menu or setting item. The
or button is also used when entering characters. - (10) OK button
- Finalizes the selection of a menu or setting item. This button is also used to resolve an error or ejects documents in the ADF (Auto Document Feeder).
- (11) Menu button
- Displays the Copy menu, Scan menu, or FAX menu screen.
- (12) Numeric buttons
- Used to enter numerical values such as the number of copies, as well as fax/telephone numbers and characters.
- (13) Tone button
- Switches to tone dialing temporarily if your machine is connected to a rotary pulse line.
- (14) Stop button
- Cancels operation when print, copy, scan, or fax transmission/reception job is in progress.
![]() Note
Note
-
The machine makes the beep sound when pressing keypad buttons on the operation panel. The keypad sound can be enabled or disabled in Sound control of Dev. user settings.
