
Starting Media Configuration Tool
There are two ways to start the Media Configuration Tool: one in Normal mode and another in Add Paper mode, which was made especially for adding and updating paper.
Starting in Normal Mode
-
Select the printer for which you want to change the media information on the Basic Tool sheet of the Quick Utility Toolbox, and then click the Media Configuration button.
-
Click the Media Configuration Tool button on the Management Tool sheet in the Quick Utility Toolbox.
-
Start up from the start menu
-
For Windows 11
From the Taskbar
 (Start button), click All apps > Canon Utilities > Media Configuration Tool.
 -
For Windows 10
From the Taskbar
 (Start button), click Canon Utilities > Media Configuration Tool.
-
Starting in Add Paper Mode
-
Double-click the media information file (Media Information File/.am1x file) or the media information backup file (.amb file).
-
Start up from the start menu
-
For Windows 11
From the Taskbar
(Start button), click All apps > Canon Utilities > Media Configuration Tool Add Paper. -
For Windows 10
From the Taskbar
(Start button), click Canon Utilities > Media Configuration Tool Add Paper.
-
![]() Note
Note
-
Quick Utility Toolbox is a Canon software application.
-
When connected to a printer, media information that was acquired from the printer is saved as a cache in the Media Configuration Tool. The screens at startup differ depending on whether caches exist or not in the Media Configuration Tool.
-
The printer's caches can be deleted. This can be executed from Clear Cache on the File menu.
-
For details on starting in Add Paper mode, see "Adding Media Information by Double-Clicking the Media Information File".
Connection to printer
If there is no cache in the Media Configuration Tool, a printer is searched for at start up and the Select Base Printer dialog box appears. If there are caches for multiple machines, the Select Base Printer dialog box appears and a list showing the printers with cache remaining appears.
-
Select the printer for which you want to change the media information, and then click the OK button.
-
The following message appears if the system fails to connect to the printer.

The main screen appears if you select the Yes button. However, you cannot add or edit media information.
Browse "Changing the Base Printer" and select a base printer to add and edit media information.
-
When connecting to a printer for the first time (when it has no cache), the Select Base Printer dialog box may not appear for some time.
-
The Select Base Printer dialog box does not appear if there is only 1 cache. The system automatically connects to the printer in which the cache remains and displays the main screen.
-
When started from the Basic Tool sheet in the Quick Utility Toolbox, only printers selected with the Quick Utility Toolbox will appear on the main screen.
-
If the printer that you wish to update the media information does not appear, click the Find Printer button or select IPv4/IPv6 in Search Method, and then click the Find Printer button, and enter the printer IP address directly.
-
To search by SNMP community, click Search Options, and then specify a Specify community name.
-
If a message about the latest media information appears, click the Yes button or the No button.
To add/update media information, refer to the following references.
 Note
Note-
Click the Yes button to acquire the media information. The Add/Update Media Information dialog box appears, and you can check the latest media information.

To add media information, do so while referring to "Adding Media Information".
-
If the following message appears, the media information file cannot be downloaded from the Internet. Obtain the media information file from the Canon website.


Specify the media information file that you obtained by selecting Acquire by specifying the media information file, clicking the Browse button, and specifying the file in the Open dialog box.
The media information for the selected printer appears in the main screen.

Then go to "Adding Media Information."
-

![]() Important
Important
![]() Note
Note
Adding Media Information
-
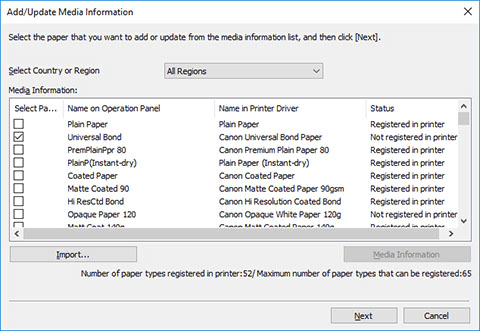
Select the check box of the media information that you want to add from the displayed media information, and then click the Next button.
 Note
Note-
If the Add/Update Media Information dialog box does not appear, click
 (Add/Update Media Information) in the Add/Save Media Information button group.
 -
The printer's paper registration status is shown under Status.
-
Not saved to printer
This paper is not registered to the printer.
-
Update Available
This paper has not been updated. It has been registered to the printer.
-
Saved to printer
The most up to date information on paper registered to the printer.
-
-
If you select your country or region in Select Country or Region, only the paper available in your country or region will be displayed.
-
If you select the media information and click the Media Information button, the Simple Paper Reference dialog box appears, allowing you to check the details of the selected media information.
-
Click the Import button. The Open dialog appears and you can select media information to import from the computer.
-
If Maximum number of paper types that can be saved displayed on the lower left of the main screen is exceeded, media information cannot be added to the printer.
-
You can add media information later.
The Update Media Information dialog box appears.
-
-
Click the Start button.
 Note
Note-
Click the Find Printer button to display printers other than the base printer. If there are other printers that you want to update the media information for at the same time as the base printer, check the printer's check box.
-
In addition to the base printer, the printers that are the same model as the base printer appear.
-
You cannot clear the check mark for the base printer.
-
-
Click the Yes button.

The Check Update Results dialog box appears.
-
Verify that
 mark appears to the left of the Printer Name, and then click the OK button.
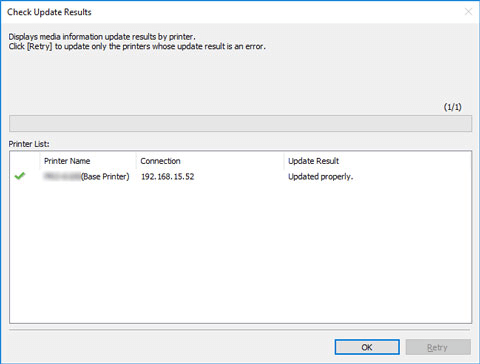 Note
Note-
Media information was not updated for printers with a
 mark displayed to the left of the Printer Name.
Verify the state of the printer and network, and click the Retry button.
Only printers with the
mark will be updated.
The media information is applied to the printer.
Next, apply the media information to the printer driver.
-
-
Click the Yes button.
 Note
Note-
If the following dialog box appears, select the printer that you are updating, and then click the OK button.

-
-
Click the OK button.
 Note
Note-
If the User Account Control dialog box appears, click the Yes button.
The printer driver's Properties screen will appear.
-
-
Update the media information in the printer driver's Properties screen.
For details, search for and refer to the "Updating Media Information in Printer Driver" page from the home page of the Online Manual for your model.
