
Performing/Changing Wireless LAN Settings
Follow the procedure below to perform/change wireless LAN settings.
![]() Important
Important
- Enable cableless setup before performing printer setup. (Not required if you change the IP address.) For details, search for "NR049" on your printer's online manual and see the page shown.
![]() Note
Note
- For some models, you can perform network setup for a USB connected printer using IJ Network Device Setup Utility. Select USB on Switch IPv4/IPv6/USB under the View menu to display printers.
-
Start up IJ Network Device Setup Utility.
Detected printers are listed.
-
Select printer to perform/change settings from printer list.
Select the printer with Wireless LAN displayed on Connection Method and the setting other than Unknown or Setup Completed displayed on Status to perform settings.
To perform setup for a USB connected printer, select USB from the pulldown menu on the toolbar and select the printer with Wireless LAN displayed on Connection Method.
-
Select Protocol Settings... on Printer menu.
The Confirm Printer Password screen appears.
For more on the password, refer to Administrator Password.
 Note
Note- Clicking the
 icon allows you to perform/change settings.
- Clicking the
-
Enter password and click OK.
The Protocol Settings screen appears.
-
Perform/change settings.
You can switch the screen between IPv4 and IPv6. Click the tab to switch the protocol.
-
IPv4/IPv6 settings
-
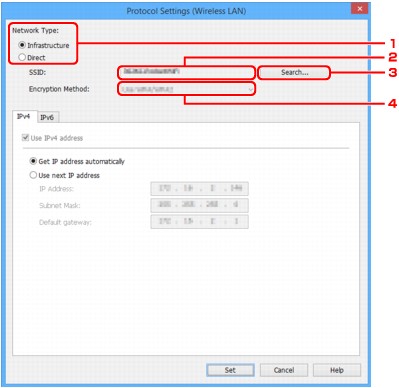
Network Type:
Select the wireless LAN mode.
- Infrastructure
- Connects the printer to the wireless LAN with a wireless router.
- Direct
- Connects the printer to wireless communication devices without a wireless router.
Note-
If Direct is selected, the Search... button is displayed in a gray out status.
In addition, you cannot connect to Internet from your computer depending on your operating environment.
-
SSID:
The network identifier (SSID) of the wireless LAN currently used is displayed.
The identifier for direct connection (SSID) appears while in direct connection.
-
Search...
The Detected Wireless Routers screen is displayed to select a wireless router to connect to. For a wireless router already connected to the computer, Available is displayed on Communication Status.
If you select a wireless router with Not Connected on Communication Status from the list, clicking Set displays the WPA/WPA2 or WEP setting screen for a wireless router.
-
Encryption Method:
Displays the encryption method used over the wireless LAN.
-
-
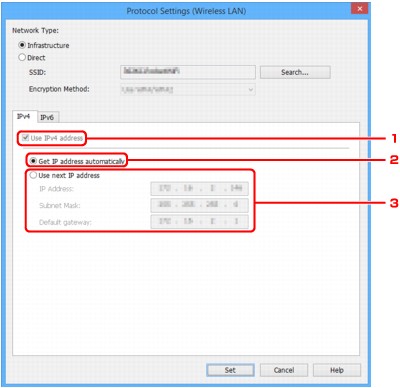
IPv4 settings
Note-
The setting items below are available only when Infrastructure is selected for Network Type:.
If Direct is selected, the setting items below are displayed in a gray out status.
-
Use IPv4 address
Always selected. (displayed in a gray out state)
-
Get IP address automatically
Select this option to use an IP address automatically assigned by a DHCP server. DHCP server functionality must be enabled on your router.
-
Use next IP address
Select this option if no DHCP server functionality is available in your setup where you use the printer, or you want to use a fixed IP address.
Enter the IP address, subnet mask, and default gateway.
-
-
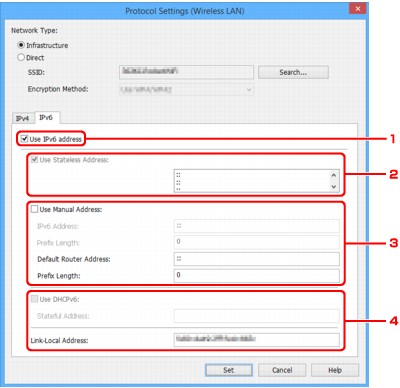
IPv6 settings
Note- If USB is selected from the pulldown menu on the toolbar, you cannot perform IPv6 settings.
-
The setting items below are available only when Infrastructure is selected for Network Type:.
If Direct is selected, the setting items below are displayed in a gray out status.
-
Use IPv6 address
Select when you use the printer with IPv6 environment.
-
Use Stateless Address:
Select when you use an IP address assigned automatically. Use a router compatible with IPv6.
Note- This setting item is not available depending on the printer you are using.
-
Use Manual Address:
Select this option if no DHCP server functionality is available in your setup where you use the printer, or you want to use a fixed IP address.
Enter the IP address and IP address prefix length.
Note- This setting item is not available depending on the printer you are using.
-
Use DHCPv6:
Select when you obtain an IP address using DHCPv6.
Note- This setting item is not available depending on the printer you are using.
-
-
Click Set.
