
Registering a Changed Printing Profile
You can name and register the printing profile you made in the Print Dialog. The registered printing profile can be called up from Presets to be used. You can also delete the unnecessary printing profile.
The procedure for registering a printing profile is as follows:
Registering a Printing Profile
In the Print dialog, set the necessary items
Select Save Current Settings as Preset... (Save As...) from the Presets
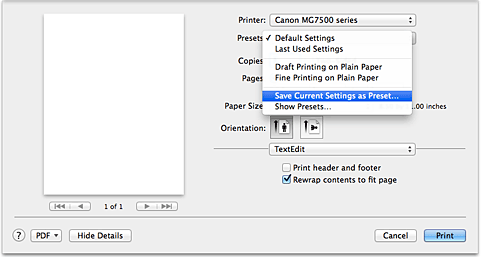
Save the settings
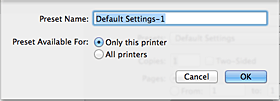
In the displayed dialog, enter a name in Preset Name, and if necessary, set Preset Available For. Then click OK.
 Important
- There are also print settings that cannot be saved to preset.
Using Registered Printing Profile
On Presets in the Print dialog, select the name of printing profile you want to use
Printing profile in the Print dialog will be updated to the called profile.
Deleting Unnecessary Printing Profile
Select the printing profile to be deleted
If you are using OS X Mavericks v10.9, OS X Mountain Lion v10.8, or OS X Lion v10.7
In the print dialog, select Show Presets... in the Presets section. Then in the dialog that appears, select the name of the printing profile to be deleted.If you are using Mac OS X v10.6.8
On Presets in the Print dialog, select the name of printing profile you want to delete.
Delete the printing profile
If you are using OS X Mavericks v10.9, OS X Mountain Lion v10.8, or OS X Lion v10.7
Click Delete, and click OK. The selected printing profiles will be deleted from Presets.If you are using Mac OS X v10.6.8
On Presets in the Print dialog, click Delete. The selected printing profiles will be deleted from Presets.
