
Printing Photos
-
Drag and drop the images you want to print to the Preview area.
You can also select photos from Open in the File menu.
 Important
- If started from Digital Photo Professional, Photoshop, Photoshop Elements, or Lightroom, images cannot be added.
 Note
Note- You can change the order to print by dragging the images in the Thumbnails area. You can also change the order of images from the Sort By menu.
-
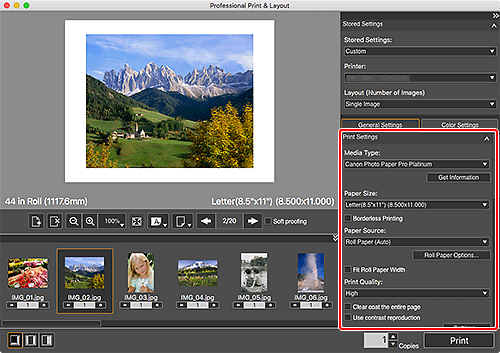
In the Stored Settings area, set the printer and Layout (Number of Images) you want to use, and other settings.
-
In Print Settings on the General Settings tab, set Media Type, Paper Source, Print Quality, and other settings.
 Important
- When Plain Paper is selected for Media Type, the print result may become faint. In that case, change the Media Type and print.
Note- The displayed paper sizes and media types vary depending on your printer.
- For the types of third party paper supported by PRO-1000 and PRO-500 series printers, refer to Art Paper Printing Guide. Art Paper Printing Guide can be downloaded from our website.
- Available paper sources and print quality vary depending on your printer and paper.
- For Print Settings on the General Settings tab, see General Settings Tab (Print Settings).
-
In Layout on the General Settings tab, set the layout you want to use.
Note- For bordered layouts, you can adjust the margin width and image size. For details, see Adjusting Margins.
- For Layout on the General Settings tab, see General Settings Tab (Layout).
-
Load paper.
-
Click Print.
A message appears.
-
Click OK.
The Print dialog appears.
-
Click Print.
![]() Note
Note
- You can also print images in black and white or correct the tones. For details, see Correcting Tones of Photos.
- You can also crop images or save settings. For details, see Using Recommended Functions.
- For the main screen, see Main Screen.
