
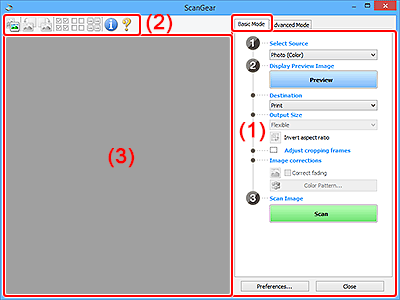
Basic Mode Tab
Use the Basic Mode tab to scan easily by following these simple on-screen steps.
This section describes the settings and functions available on the Basic Mode tab.
![]() Note
Note
- The displayed items vary by document type and view.
- Preview is not available when scanning from the ADF (Auto Document Feeder).
(1) Settings and Operation Buttons
- Select Source
-
- Photo (Color)
- Scan color photos.
- Magazine (Color)
- Scan color magazines.
- Document (Color)
- Scan documents in color.
- Document (Grayscale)
- Scan documents in black and white.
- Document (Color) ADF Simplex
- Scan documents from the ADF in color.
- Document (Grayscale) ADF Simplex
- Scan documents from the ADF in black and white.
- Document (Color) ADF Duplex (only for models supporting ADF duplex scanning)
-
Scan both sides of documents from the ADF in color.
- Document (Grayscale) ADF Duplex (only for models supporting ADF duplex scanning)
-
Scan both sides of documents from the ADF in black and white.
 Important
- Some applications do not support continuous scanning from the ADF. For details, see the application's manual.
 Note
Note- When you select a document type, the unsharp mask function will be active.
- When you select an option other than the ADF types, the image adjustment function which adjusts images based on the document type will also be active.
- When you select Magazine (Color), the descreen function will be active.
- Display Preview Image
-
- Preview
-
Performs a trial scan.
 Note
Note- When using the machine for the first time, scanner calibration starts automatically. Wait a while until the preview image appears.
- Destination
-
Select what you want to do with the scanned image.
- Select this to print the scanned image on a printer.
- Image display
- Select this to view the scanned image on a monitor.
- OCR
-
Select this to use the scanned image with OCR software.
"OCR software" is software that converts text scanned as an image into text data that can be edited in word processors and other programs.
- Output Size
-
Select an output size.
Output size options vary by the item selected in Destination.
- Flexible
-
Adjust the cropping frames (scan areas) freely.
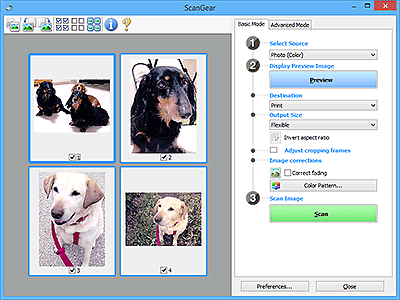
In thumbnail view:
Drag the mouse over a thumbnail to display a cropping frame. When a cropping frame is displayed, the portion within the cropping frame will be scanned. When no cropping frame is displayed, each frame is scanned individually.
In whole image view:
When no cropping frame is displayed, the entire Preview area will be scanned. When a cropping frame is displayed, the portion within the cropping frame will be scanned.
- Paper Size (such as L or A4)
- Select an output paper size. The portion within the cropping frame will be scanned at the size of the selected paper size. Drag the cropping frame to enlarge/reduce it while maintaining the aspect ratio.
- Monitor Size (such as 1024 x 768 pixels)
- Select an output size in pixels. A cropping frame of the selected monitor size will appear and the portion within the cropping frame will be scanned. Drag the cropping frame to enlarge/reduce it while maintaining the aspect ratio.
- Add/Delete...
-
Displays the Add/Delete the Output Size dialog box for specifying custom output sizes. This option can be selected when Destination is Print or Image display.
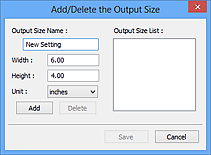
In the Add/Delete the Output Size dialog box, multiple output sizes can be specified and then saved at one time. Saved items will be registered to the Output Size list and can be selected, along with the predefined items.
Adding:
Enter Output Size Name, Width, and Height, and then click Add. For Unit, select inches or mm if Destination is Print; if it is Image display, only pixels can be selected. The name of the added size appears in Output Size List. Click Save to save the items listed in Output Size List.
Deleting:
Select the output size you want to delete in Output Size List, and then click Delete. Click Save to save the items listed in Output Size List.
Important- Predefined output sizes such as A4 and 1024 x 768 pixels cannot be deleted.
Note- Save up to 10 items.
- An error message appears when you enter a value outside the setting range. Enter a value within the setting range.
Note- For details on whether or how the cropping frame initially appears on a preview image, see Cropping Frame on Previewed Images in Preview tab of Preferences Dialog Box.
 Invert aspect ratio
-
Available when Output Size is set to anything but Flexible.
Click this button to rotate the cropping frame. Click again to return it to the original orientation.
- Adjust cropping frames
-
Adjust the scan area within the Preview area.
If an area is not specified, the document will be scanned at the document size (Auto Crop). If an area is specified, only the portion in the cropping frame will be scanned.
- Image corrections
-
Correct the image to be scanned.
Important- Apply Auto Document Fix and Correct fading are available when Recommended is selected on the Color Settings tab of the Preferences dialog box.
Note- Available functions vary by the document type selected in Select Source.
- Apply Auto Document Fix
-
Sharpens text in a document or magazine for better readability.
Important- Scanning may take longer than usual when this checkbox is selected.
- The color tone may change from the source image due to corrections. In that case, deselect the checkbox and scan.
- Correction may not be applied properly if the scan area is too small.
- Correct fading
- Corrects photos that have faded with time or have a colorcast.
- Correct gutter shadow
-
Corrects shadows that appear between pages when scanning open booklets.
Important- Be sure to see Gutter Shadow Correction for precautions and other information on using this function.
- Color Pattern...
-
Adjust the image's overall color. Correct colors that have faded due to colorcast or other reasons and reproduce natural colors while previewing color changes.
Important- This setting is not available when Color Matching is selected on the Color Settings tab of the Preferences dialog box.
- Scan Image
-
- Scan
-
Starts scanning.
Note- When scanning starts, the progress appears. To cancel the scan, click Cancel.
- Preferences...
- Displays the Preferences dialog box for making scan/preview settings.
- Close
- Closes ScanGear (scanner driver).
(2) Toolbar
Adjust or rotate preview images. The buttons displayed on the Toolbar vary by view.
In thumbnail view:

In whole image view:

 (Thumbnail) /
  (Whole Image)
-
Switches the view in the Preview area.
 (Rotate Left)
-
Rotates the preview image 90 degrees counter-clockwise.
- The result will be reflected in the scanned image.
- The image returns to its original state when you preview again.
 (Rotate Right)
-
Rotates the preview image 90 degrees clockwise.
- The result will be reflected in the scanned image.
- The image returns to its original state when you preview again.
 (Auto Crop)
- Displays and adjusts the cropping frame automatically to the size of the document displayed in the Preview area. The scan area is reduced every time you click this button if there are croppable areas within the cropping frame.
 (Check All Frames)
-
Available when two or more frames are displayed.
Selects the checkboxes of the images in thumbnail view.
 (Uncheck All Frames)
-
Available when two or more frames are displayed.
Deselects the checkboxes of the images in thumbnail view.
 (Select All Frames)
-
Available when two or more frames are displayed.
Selects the images in thumbnail view and outlines them in blue.
 (Select All Cropping Frames)
-
Available when two or more cropping frames are specified.
Turns the cropping frames into thick broken lines and applies the settings to all of them.
 (Remove Cropping Frame)
- Removes the selected cropping frame.
 (Information)
- Displays the version of ScanGear, along with the document type and other details of the current scan settings.
 (Open Guide)
- Opens this page.
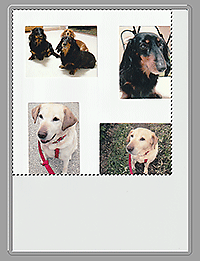
(3) Preview Area
This is where a trial image appears after you click Preview. The results of image corrections, color adjustments, and other settings made in (1) Settings and Operation Buttons are also reflected.
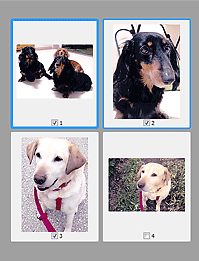
When (Thumbnail) is displayed on Toolbar:
Cropping frames are specified according to the document size, and thumbnails of scanned images appear. Only the images with the checkbox selected will be scanned.
![]() Note
Note
-
When multiple images are previewed, different outlines indicate different selection status.
- Focus Frame (thick blue outline): The displayed settings will be applied.
- Selected Frame (thin blue outline): The settings will be applied to the Focus Frame and Selected Frames simultaneously. To select multiple images, click them while pressing the Ctrl key.
- Unselected (no outline): The settings will not be applied.
- Double-click a frame to enlarge the image. Click
 (Frame Advance) at the bottom of the screen to display the previous or next frame. Double-click the enlarged frame again to return it to its original state.
When (Whole Image) is displayed on Toolbar:
Items on the Platen are scanned and appear as a single image. All portions in the cropping frames will be scanned.
![]() Note
Note
-
Create cropping frame(s) on the displayed image. In thumbnail view, one cropping frame can be created per image. In whole image view, multiple cropping frames can be created.
