
Scanner Tab
On the Scanner tab, you can specify the following settings.
![]() Important
Important
- Available functions and settings vary depending on your scanner or printer.
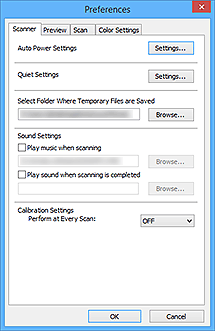
- Auto Power Settings
-
You can set to turn the machine on or off automatically.
Click Settings... to display the Auto Power Settings dialog box.
 Note
Note- If the machine is off or bi-directional communication is disabled, a message may appear because the computer cannot collect the machine status. In that case, click OK to exit ScanGear (scanner driver).
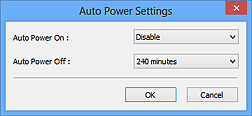
- Auto Power On
- Select Enable to turn on the machine automatically when data is received.
- Auto Power Off
-
Specify the amount of time you want to set from the list. When this time lapses without any data being received, the machine turns off automatically.
 Important
-
When connected to the network, depending on your model, the power does not turn off automatically even if Auto Power Off is set.
Refer to "Function Support List by Model (Auto Power Off)" to check if your model supports the Auto Power Off function.
-
- Quiet Settings
-
The silent function allows you to reduce the operating noise of this machine. Use this when you wish to reduce the operating noise such as when scanning or printing at night.
Click Settings... to set the quiet mode.
Note- You can set the quiet mode from the operation panel of the machine, the printer driver, or ScanGear.
No matter how the setting is made, it applies to operations from the operation panel of the machine or when printing/scanning from a computer, etc. - Scanning or printing may take longer than usual when this function is used.
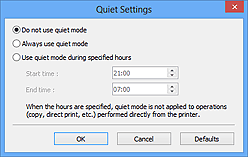
- Do not use quiet mode
- Select this option when you wish to use the machine with volume of normal operating noise.
- Always use quiet mode
- Select this option when you wish to reduce the operating noise of the machine.
- Use quiet mode during specified hours
-
Select this option when you wish to reduce the operating noise of the machine during a specified period of time.
Set the Start time and End time during which quiet mode is to be activated.
Important- The time specified in Start time and in End time must be different.
- If your scanner or printer does not support fax functions, quiet mode is not applied to operations (copy, direct print, etc.) performed directly from the machine even if the hours are specified.
- You can set the quiet mode from the operation panel of the machine, the printer driver, or ScanGear.
- Select Folder Where Temporary Files are Saved
- Displays the folder in which to save images temporarily. To change the folder, click Browse... to specify another one.
- Sound Settings
-
You can set the machine to play music during/at the end of a scan.
Select the Play music when scanning or Play sound when scanning is completed checkbox, then click Browse... and specify a sound file.
You can specify the following files.
- MIDI file (*.mid, *.rmi, *.midi)
- Audio file (*.wav, *.aif, *.aiff)
- MP3 file (*.mp3)
- Calibration Settings
-
- Platen Calibration
- When you click Start, calibration starts and the scanner will be adjusted to reproduce correct color tones in scanned images. Perform calibration when the color tones in the preview image are significantly different from the original item or when colors appear in white areas.
- Perform at Every Scan
-
When you set to ON, the scanner will be calibrated every time before previewing and scanning, to reproduce correct color tones in scanned images.
Note- Even when Perform at Every Scan is set to OFF, the scanner may be calibrated automatically in some cases (such as immediately after you turn the machine on).
Note- Calibration may take time depending on your computer.
- Test Scanner...
- Opens the Scanner Diagnostics dialog box from which you can run the scanner performance test. Click Start to start the diagnostics.
