
Settings (COPY) Dialog Box
Click COPY on the  (Scanning Using the Scanner Buttons) tab to display the Settings (COPY) dialog box.
In the Settings (COPY) dialog box, you can specify how to respond when printing images on a printer after scanning them using the scanner button.
![]() Note
Note
- Selectable paper sizes and types vary by printer.
- When multiple items are placed on the platen and Auto is selected for Select Source, each item is scanned individually and printed on a separate sheet of paper. To print multiple items on one sheet of paper, select an option other than Auto and select a standard size (A4, Letter, etc.) for Paper Size.
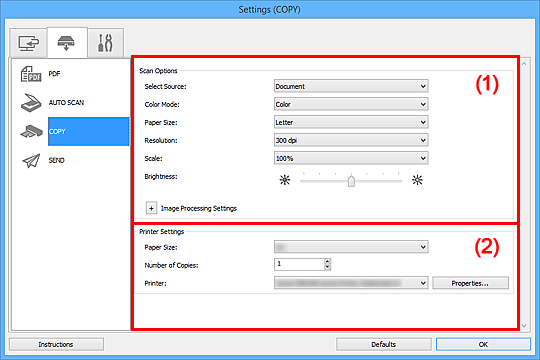
(1) Scan Options Area
- Select Source
-
Select the type of item to be scanned. Select Auto to detect the item type automatically and to set Color Mode, Paper Size, and Resolution automatically as well.
 Important
- Item types supported by Auto are photos, postcards, business cards, magazines, newspapers, documents, and BD/DVD/CD.
-
To scan the following types of items, specify the item type or size. You cannot scan correctly with Auto.
- A4 size photos
- Text documents smaller than 2L (5 inches x 7 inches) (127 mm x 178 mm), such as paperback pages with the spine cut off
- Items printed on thin white paper
- Long narrow items such as panoramic photos
- Reflective disc labels may not be scanned as expected.
-
Place items correctly according to the type of item to be scanned. Otherwise, items may not be scanned correctly.
Refer to "Placing Items (When Scanning from a Computer)" for how to place items.
 Note
Note- To reduce moire, set Select Source to Magazine.
- Color Mode
- Select the color mode in which to scan the item.
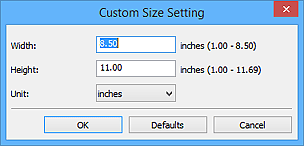
- Paper Size
-
Select the size of the item to be scanned.
When you select Custom, a screen in which you can specify the paper size appears. Select a Unit, then enter the Width and Height, and then click OK.
 Note
Note- Only Auto is available when Select Source is Auto.
- Click Defaults in the screen in which you can specify the paper size to restore the specified settings to the default settings.
- Resolution
-
Select the resolution of the item to be scanned.
The higher the resolution (value), the more detail in your image.
Note- Only Auto is available when Select Source is Auto.
- Scale
-
Select a scale according to the paper to print on and purpose of use.
Select Fit to Paper to resize the scanned image automatically to fit the paper to print on. Since the image's aspect ratio is maintained, margins may appear at the top and bottom or on the left and right depending on the size of the item and paper.
Select Custom to enter a value in Scale Setting. Enter a percentage (25 % to 400 %) and click OK.
Note-
Scanned images are printed on paper of the size specified on your printer.
Refer to the manual of your printer for details.
-
- Brightness
-
Adjust the image brightness.
Move the slider to the left to darken and right to brighten the image.
Important- This function is available only when Magazine or Document is selected for Select Source.
- This function is not available when Auto scan is selected for Paper Size.
- Image Processing Settings
-
Click
 (Plus) to set the following. Available setting items vary by Select Source.
-
When Select Source is Photo:
Note- When Color Mode is Black and White, Image Processing Settings is not available.
- Sharpen outline
- Emphasizes the outline of the subjects to sharpen the image.
-
When Select Source is Magazine or Document:
Note- When Color Mode is Black and White, only Reduce gutter shadow appears.
- Apply Auto Document Fix
-
Select this checkbox to sharpen text in a document or magazine for better readability.
Important- The color tone may differ from the source image due to corrections. In that case, deselect the checkbox and scan.
Note- Scanning takes longer than usual when you enable this function.
- Sharpen outline
- Emphasizes the outline of the subjects to sharpen the image.
- Reduce show-through
- Sharpens text in an item or reduces show-through in newspapers, etc.
- Reduce moire
-
Reduces moire patterns.
Printed materials are displayed as a collection of fine dots. "Moire" is a phenomenon where uneven gradation or a stripe pattern appears when such photos or pictures printed with fine dots are scanned.
Note- Scanning takes longer than usual when you enable Reduce moire.
- Reduce gutter shadow
-
Reduces gutter shadows that appear between pages when scanning open booklets.
Note- Use ScanGear (scanner driver)'s Advanced Mode tab to correct gutter shadows when scanning non-standard size items or specified areas.
Refer to "Gutter Shadow Correction" for your model from Home of the Online Manual for details.
- Use ScanGear (scanner driver)'s Advanced Mode tab to correct gutter shadows when scanning non-standard size items or specified areas.
-
When Select Source is Auto:
- Apply recommended image correction
-
Applies suitable corrections automatically based on the item type.
Important- The color tone may differ from the source image due to corrections. In that case, deselect the checkbox and scan.
Note- Scanning takes longer than usual when you enable this function.
-
(2) Printer Settings Area
- Paper Size
-
Select the size of the paper to print on.
Note- Selectable paper sizes depend on the selected printer.
- Number of Copies
- Specify the number of copies to print.
Click (up and down buttons) to the right of the value or enter a value.
Specify up to 99 copies. - Printer
- Select a printer to use when multiple printers are connected.
Click Properties... to open a dialog box to configure the printer settings.
- Instructions
- Opens this guide.
- Defaults
- You can restore the settings in the displayed screen to the default settings.
