
Save Settings Dialog Box
Select the Check scan results checkbox in Save Settings of the Settings dialog box to display the Save Settings dialog box after scanning.
You can specify the data format and destination while viewing the thumbnails of scan results.
![]() Important
Important
- After scanning from My Image Garden or the operation panel, the Save Settings dialog box does not appear.
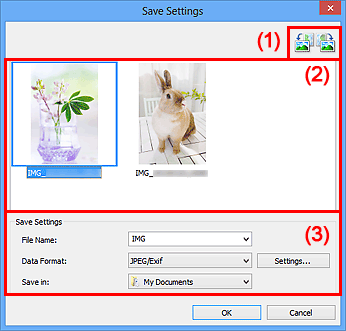
(1) Preview Operation Buttons
 /
/  (Rotate Left 90°)/(Rotate Right 90°)
-
Rotates scanned images 90 degrees counter-clockwise or clockwise.
Select the image you want to rotate, then click
(Rotate Left 90°) or (Rotate Right 90°).
![]() Important
Important
- The preview operation buttons do not appear when the Enable large image scans checkbox is selected in the Settings (ScanGear) dialog box.
(2) Scan Results Area
Displays the thumbnails of the scanned images. You can change the save order of images via drag-and-drop. The file names for saving appear below the thumbnails.
(3) Save Settings Area
- File Name
- Enter the file name of the image to be saved. When you save a file, the date and four digits are appended to the set file name in the "_20XX0101_0001" format.
- Data Format
-
Select the data format in which to save the scanned images.
You can select JPEG/Exif, TIFF, PNG, PDF, or PDF (Multiple Pages).
 Important
-
You cannot select PDF or PDF (Multiple Pages) in the following cases.
- When scanned by clicking Photo in the IJ Scan Utility main screen
- The Enable large image scans checkbox is selected in Save Settings of the Settings (ScanGear) dialog box
- Start OCR is selected in Application Settings of the Settings (Document Scan), Settings (Custom Scan), or Settings (ScanGear) dialog box
- You cannot select JPEG/Exif when Color Mode is Black and White.
-
- Settings...
- Click to display the Data Format Settings dialog box in which you can set the quality of the images to be saved, keyword search of PDF files and their compression type, and the data format in which to save images scanned with Auto Scan.
- Save in
-
Displays the folder in which to save the scanned images. To change the folder, specify the destination folder in the Select Destination Folder dialog box displayed by selecting Add... from the pull-down menu.
The default save folders are as follows.
- Windows 8: My Documents folder
- Windows 7: My Documents folder
- Windows Vista: Documents folder
- Windows XP: My Documents folder
