
Changing the Connection Mode
You can switch the connection mode by pressing and holding the Wi-Fi button on the printer.
Setup is required when connecting to the printer for the first time. Return to the application screen and set up the printer.
-
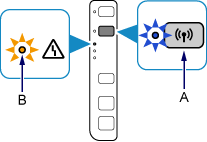
Press and hold the Wi-Fi button (A) on the printer until the Alarm lamp (B) flashes a specified number of times.
The connection mode switches depending on the number of flashes.
When Changing to Access Point Mode
Release the Wi-Fi button after the third flash.
Go to step 2.
When Enabling Wireless Connection
Release the Wi-Fi button after the fourth flash.
The subsequent step is not necessary. Return to the application screen and proceed with the setup.
-
Check the SSID and network key, then proceed with the setup in the Wi-Fi settings screen on your device (such as a smartphone).
The default SSID is the printer name. Print the LAN setting information and check the SSID field.
-
How to print the LAN setting information
Hold down the Stop button on the printer until the Alarm lamp flashes 15 times, then release the Stop button after the fifteenth flash.
The LAN setting information will be printed.
The default network key is the serial number of the printer. Check the rear side of the printer or warranty.
-
