
MG3520Registering Printer with Canon PRINT - Android -
Downloading Canon PRINT
Install Canon PRINT from Setup Using Canon PRINT - Android -.
Registering Printer with Canon PRINT
Follow the steps below to register the printer with Canon PRINT.
![]() Important
Important
- If you have a wireless router, connect the smartphone to the wireless router.
- If you do not have a wireless router, enable Wi-Fi in the Wi-Fi settings screen on the smartphone.
- For the operation procedure, see the manual supplied with the smartphone or wireless router, or contact the manufacturer of the smartphone or wireless router.
In this section, descriptions are based on the screens displayed when using Android 8.1.
![]() Note
Note
- Screens displayed may vary depending on your smartphone.
-
Check that printer is turned on.
-
Start application.
 Note
Note- License screen appears upon initial startup.
-
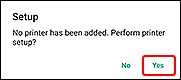
If following screen appears, tap Yes, and then follow on-screen instructions to connect printer to network.
Once the network connection is complete, skip ahead to Step 12.
If the following screen does not appear, proceed to the next step.
-
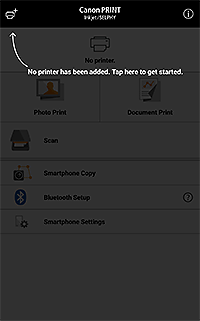
Tap
 (Register Printer) at upper left of screen.
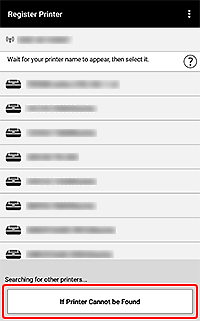
Printer detection starts.
Note- Detection may take time.
- If the printer is not detected even though its network connection is already complete, check that the printer is connected to the same wireless router as your smartphone.
-
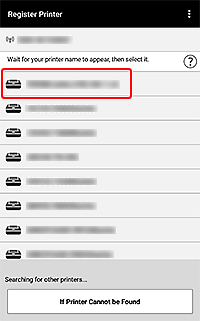
Tap printer name that appears.

If your printer does not appear, skip ahead to Step 7.
-
Check if your printer appears at the top of the screen.
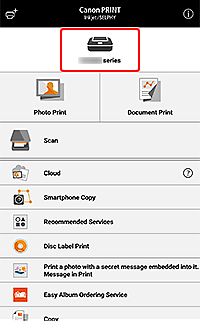
When the registered printer appears at the top of the screen, setup is complete. There is no need to perform the steps below.
Note-
The following screen appears only when registering a printer.
-
-
Tap If Printer Cannot be Found.
 Note
Note-
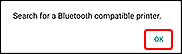
If the following screen appears, tap OK, and then follow the on-screen instructions to connect the printer to a network.
Once the network connection is complete, skip ahead to Step 12.
-
-
Tap Auto Connection (recommended).

-
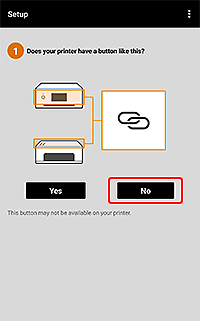
Tap No.
-
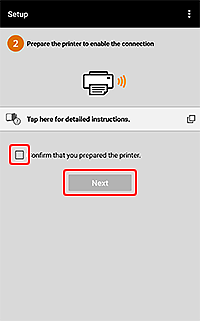
Prepare connection on printer.
For connection preparation, see Setup Guide.
-
Select Confirm that you prepared the printer. checkbox, and then tap Next.
Follow the on-screen instructions to connect the printer to a network.
-
Check if your printer appears at the top of the screen.
When the registered printer appears at the top of the screen, setup is complete.
If the following screen appears, check that your printer name is displayed.
If your printer name is displayed, perform the setup again from Step 5; if not, perform from Step 7.
 Note
Note-
The following screen appears only when registering a printer.
-
Printing Using Application
-
Start application.
-
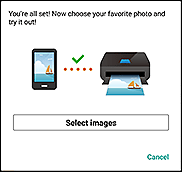
Tap Select Images.
Note- Select Images appears only when registering a printer. If Select Images does not appear, tap Photo Print.
-
Select image you want to print, and then tap Next.
-
Specify printer to use, paper size, and other settings.
-
Tap Print.
Printing starts with the specified settings.
