
This section describes some of the errors or messages.
 Note
NoteA Support Code (error number) is displayed on the computer or on the LCD for some error or message. For details on errors with Support Codes, refer to Support Code List.
If a message is displayed on the LCD, see below.
If a message is displayed on the computer, see below.
Confirm the message and take an appropriate action.
Failed to scan the head alignment sheet Press [OK]
Scanning the print head alignment sheet has failed.
Press the OK button to dismiss the error, then take the actions described below.
Make sure that the print head alignment sheet is set in the correct position and orientation on the platen glass.
Make sure the platen glass and the print head alignment sheet are not dirty.
Make sure the type and size of loaded paper is suitable for Automatic Print Head Alignment.
For Automatic Print Head Alignment, always load one sheet of A4 or Letter-sized plain paper.
Make sure if print head nozzles are clogged.
Print the nozzle check pattern to check the status of the print head.
If the error is not resolved, connect the machine to the computer and align the print head on the printer driver.
Check page size Press [OK]
The size of the loaded paper is different from that specified in the paper size setting.
Load the same size of paper as that specified in the paper size setting, then press the OK button.
Data error Press [OK]
A power failure has occurred or the power cord has been unplugged when the faxes are stored in the machine's memory.
 Important
If a power failure occurs or you unplug the power cord, all faxes stored in the machine's memory are deleted.
For details on how to unplug the power cord, see Notice for Unplugging the Power Cord.
Press the OK button.
After pressing the OK button, the list of the faxes deleted from the machine's memory (MEMORY CLEAR REPORT) will be printed.
For details, refer to Summary of Reports and Lists.
If the Inkjet Printer/Scanner/Fax Extended Survey Program is installed, the printer and application software usage information is scheduled to be sent every month for about ten years. The Inkjet Printer/Scanner/Fax Extended Survey Program icon appears in the Dock when it is time to send the printer usage information.
Read the instructions on the screen after clicking the icon, then follow the procedure below.
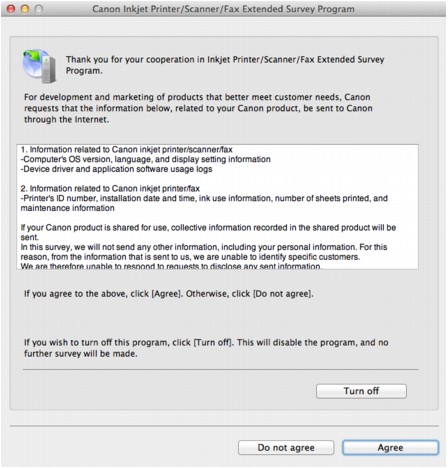
If you agree to participate in the survey program:
Click Agree, then follow the on-screen instructions. The printer usage information will be sent via the Internet. If you have followed the on-screen instructions, the information will be sent automatically from the second time onward and the confirmation screen will not be displayed again.
NoteIf you deselect the Send automatically from the next time check box, the information will not be sent automatically from the second time onward and the Inkjet Printer/Scanner/Fax Extended Survey Program icon will appear in the Dock at the time of the next survey.
If you do not agree to participate in the survey program:
Click Do not agree. The confirmation screen will be closed, and the survey at that time is skipped. The confirmation screen will be displayed again one month later.
To stop sending the information:
Click Turn off. The Inkjet Printer/Scanner/Fax Extended Survey Program is stopped, and the information will not be sent. To resume the survey, see Changing the setting:.
To uninstall the Inkjet Printer/Scanner/Fax Extended Survey Program:
Stop the Inkjet Printer/Scanner/Fax Extended Survey Program.
Select Applications from the Go menu of Finder, and double-click the Canon Utilities folder, then the Inkjet Extended Survey Program folder.
Place the Canon Inkjet Printer/Scanner/Fax Extended Survey Program.app file into the Trash.
Restart the computer.
Empty the Trash and restart your computer.
Changing the setting:
To display the confirmation screen every time the printer usage information is sent or to resume surveying, follow the procedure below.
Select Applications from the Go menu of Finder, and double-click the Canon Utilities folder, then the Inkjet Extended Survey Program folder.
Double-click the Canon Inkjet Printer/Scanner/Fax Extended Survey Program icon.
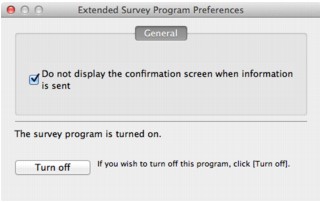
Do not display the confirmation screen when information is sent:
If the check box is selected, the information will be sent automatically.
If the check box is not selected, the Inkjet Printer/Scanner/Fax Extended Survey Program icon will appear in the Dock at the time of the next survey. Click the icon, then follow the on-screen instructions.
Turn off/Turn on button:
Click the Turn off button to stop the Inkjet Printer/Scanner/Fax Extended Survey Program.
Click the Turn on button to restart the Inkjet Printer/Scanner/Fax Extended Survey Program.
Page top |
